Gadget review – Solar Kettle
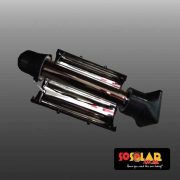
If my cooker packed up or I ran out of fuel would this solar kettle be a viable option to heat water to re-constitute a freeze dried meal? Let me know what you think?

If my cooker packed up or I ran out of fuel would this solar kettle be a viable option to heat water to re-constitute a freeze dried meal? Let me know what you think?
Things are getting real…
Got my first look at my Ocean X kayak being built by Further Composites. Timber frames form the shape of the 8m long hull. The core material will be stripped and formed to the hull shape before laminating the first of the outer skins.
I chatted to Dylan, the boat builder who is building my kayak…check it out here.
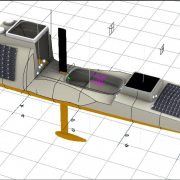
It literally feels like yesterday when Smile FM Radio announced live on 13 May 2019 that I was going to kayak solo and unassisted across the Atlantic Ocean. Much has happened since then, but this story is to pick up on the latest update around the actual design of the OCEAN X KAYAK.
Fast forward to post-Covid and the 13 August 2020 …
Almost to the day, eight weeks ago, I was having coffee at my local shopping centre with a well-known yachtsman, Nick Leggett, and while I was trying to convince him to join the team and offer his weather routing skills, a friend, Shaun Ferry, popped over to say hello.
Shaun asked for the latest news on the kayak design and build. I told him that I was still looking for the best boat builder to fit my needs and that I had been in contact with several possible options but had nothing concrete. He casually asked if I had chatted to Richard “Thirsty” Bertie?
Keep in mind that I am a terrible procrastinator, of the worst kind!
“No, not yet. But I was going to,” I replied.
Shaun is not a procrastinator. He just took out his phone and called Thirsty then and there. After a quick chat. he passed the phone over to me and said: “Here you go, speak to him.”
Later that day was the first time since July, when my friend, kayak builder and designer Uwe passed away, that I was able to get access to his laptop to see if I could find a copy of the design drawings. Unfortunately, all that I could find was a single CAD file. Most of the latest design discussions and modifications never made it to this file. Check out my blog post from June here.
A week later I met with Richard in Noordhoek to seek his assistance in the construction of my kayak. I think it took him a few long minutes to digest what I was planning and whether I was a complete nut job, or if there was something more to it.
I am very pleased to say he became quite intrigued by the whole idea and by the time we had said our farewells he had contacted someone to do the build. He also contacted a good friend of his, a yacht designer by the name of Phil Southwell, and convinced him to spare a few hours to complete the design that Uwe had started.
I remember driving home over Ou Kaapse Weg and thinking how amazing that short meeting was. The kindness, honesty, enthusiasm, and knowledge that Thirsty was going to bring to the team gave me the huge boost that I so badly needed.
Phil Southwell sailed into Cape Town in 1981 and has been in South Africa on and off ever since. He designed with Lavranos & Associates for almost seven years, gaining the required experience after completing his degree for membership of the Royal Institute of Naval Architects. Phil Southwell established Southwell Yacht Design in 1989 and he designs exclusively in 3D.
I finally met Phil the following week. I had sent him a few screen shots of the CAD drawings beforehand and must admit that I felt a little out of my comfort zone. Uwe was a good friend and we talked openly and debated each concept of the design until we were both happy with each item.
I had never met Phil before. I knew of his reputation as a top-class designer. What I did not know was to what extent he was willing to assist. I should not have been concerned. Phil has put in countless hours into the design and is a remarkable talented designer.
In the past five weeks we have taken the original drawings and have gone through another 10 versions/design changes! We have a design/build team meeting weekly and when I listen to Phil, Thirsty and Dylan discuss how each aspect of the design fits into the reality of the construction, I sit back and smile quietly to myself knowing I have the best of the best on my side here. Well, it’s actually because I have no idea what they are talking about! ?
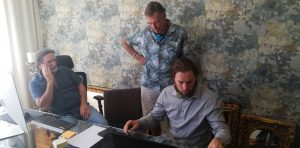
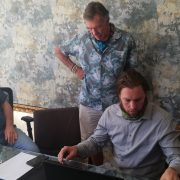
ABOVE: Phil, Richard, Dylan discussing stuff I don’t understand.
The basic dimensions of the Ocean X kayak are 8m long and 94cm at my paddle entry. The rudder is transom hung and will knock up if it collides with anything. I prefer the transom rudder to having a rudder shaft running through the hull from a safety aspect and accessibility should anything need attention.
For increased stability and weight reduction I have opted for a short lifting keel with a lead bulb (30-50kg) versus using water ballast in the hull. There is a compromise between using the weight of water ballast versus the drag of the keel. I feel confident that my design is on the correct side of this equation.
The keel box has been designed to absorb a collision with an object or beast. It has compression/absorption zones fore and aft as well as shear pins. If the keel was to fall off, then I have the backup of using water ballast bladders for extra stability.
In the front of the hull there is a lifting canard (skeg). This will be pulled down only when there is wind from the side. The windage on the cabin, which is in the front, will cause the bow of the kayak to blow away from the wind. The canard will help counter this action.
The kayak is of a carbon core construction and should weigh in at around 85kg without the lead bulb of the keel. The maximum overall weight of the kayak, gear, food and I can be no more than 400kg. Obviously less is better but to take enough equipment and supplies to keep me alive for up to 80 days does not come without its weight challenges.
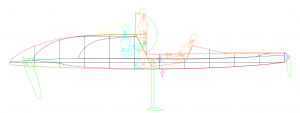
See below for a snapshot of the design progression starting with my own crude drawings to Uwe’s and finally with Phil’s perfection that goes into manufacturing today.
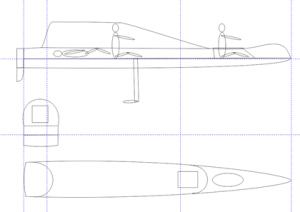
ABOVE LEFT: These are my first drawings.
ABOVE RIGHT: Uwe’s CAD drawing
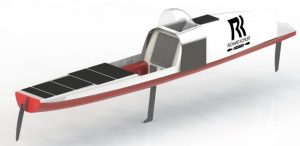
ABOVE: Uwe design 3D render
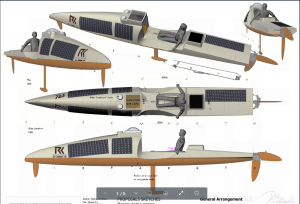
LEFT: Phil Southwell design. Solar panel placements and sizes to change.
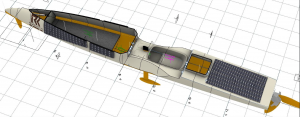
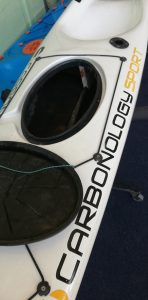
ABOVE: Here you can peek inside and make out my bunk. The bulkhead forward showing the sealed compartment containing the lifting canard. In front of this will be a crash bulkhead and a sacrificial foam filled “nose cone”. The aft hatch is for the food and spares storage.
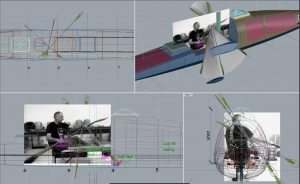
ABOVE: Overlaying my paddling stroke to perfect the cut-away on the side of the deck and the cabin.
Craft build starts next week so should be complete by December, allowing me a few weeks of testing and training before I hit the open seas.
Keep watching this space for the exciting build progress as we get closer to departure date.
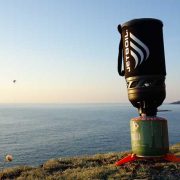
All my cooking will be done with boiling water. I will have no need to fry, bake or the likes.
Jetboil stoves are brilliant. The Jetboil is far and away the best system I’ve used. Fast, compact and efficient. I will take a number of spare lighters, because the ignition unit is a major weak point in a salty environment.
The Jetboil only uses 5g of gas to boil 500ml of water. Allowing for some waste I should only need to take as little as 2.5kg of gas. As with every system on board I will have a backup plan. My alternative cooker is due to arrive on Tuesday so I will do a review of it after I have thoroughly tested it.
I will make my freeze-dried meal in a thermos mug and not in the bag that it comes in. If I make it in the bag, I have smelly rubbish to keep someplace (all plastics will be audited before and after). The thermos mug is washable, and also means I can allow the meal longer to rehydrate fully without it going cold.
I will need to make a gimbal system for the cooker so if there are any engineers who have some time on their hand and would like to do this for me it would be much appreciated.
Jetboil Review at Sea:
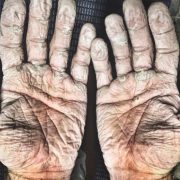
My body and mind are going to be pushed to the extreme during crossing my from Cape Town to Salvador in Brazil, and one aspect that people don’t realise is the constant exposure that my skin has to deal with.
Skin problems like buttock irritation, hand scaling and sunburn are the most common issues that ocean-faring adventurers suffer from. You can see from the graph below after a 24-day transatlantic yacht race what skin ailments the competitors developed. Keep in mind these sailors can stand and walk around.
I can’t!
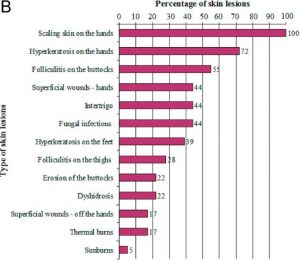
Scaling is peeling or flaking skin and it’s an unavoidable issue when your hands and feet are wet for extended periods. Paddlers’ hands tend to lose their natural oils from being soaking wet and with the constant squeezing action of gripping the paddle shaft on each stroke. After a while, the skin can form friction blisters as the oils in the skin no longer act as a lubricant between the layers.
The trick to try to limit the loss of natural oils is to pre-oil my hands. Typically, I apply the likes of petroleum jelly or “Dubbin” – a leather oil that was the only way to waterproof those old leather rugby balls – before a paddling race that gets absorbed into the skin. You must allow time for it to soak into the skin or the paddle will behave like a slippery eel in your hands.
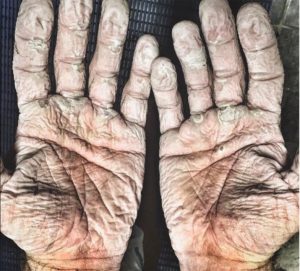
(Pic above) The hands of an ocean rower.
I will also use gloves to reduce the build-up of blisters but the drawback of gloves is that my hands remain wet when the gloves get wet, so it’s a careful management of the tools to limit hand-scaling and blistering.
The dreaded “gunwale bum” is the one I am most concerned about – for obvious reasons! There are many names for this skin ailment, but the medical term is Folliculitis, which affects the hair follicles of the skin.
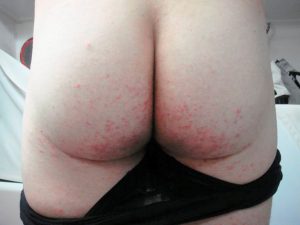
(Pic above) Mild folliculitis (TMI??)
Folliculitis occurs when hair follicles become clogged and infected with bacteria, leading to red bumps and pus-filled follicles. These bacteria usually live on the skin without incident but under the strain of constantly sitting (friction) in salty damp (sweaty) conditions, the bacteria get clogged and irritate the hair follicles – causing bumps that look like pimples. It can range from mildly irritating to completely debilitating, but if left unchecked they can turn into abscess or boils. Should this occur it would be very difficult to sit, let alone paddle!
So how do I combat or limit this painful issue? My first defence is regular washing to keep the follicles clean by removing dirt, oil, and sweat. The problem here is that water is a very scarce resource. I have considered using baby wipes, but they are not ideal as they can be a little harsh on the skin and keeping used baby wipes around for 80 days is not very appealing!
Another method is a barrier cream with an anti-fungal component. As a keen cyclist I use this type of cream on the chamois of my shorts. So, could these creams work for paddling? I won’t have chamois in my paddling shorts and I won’t be wearing shorts (eek!) most of the time, so I would apply directly to my skin.
I have been doing some testing for some time now and these are the products on my test sheet.
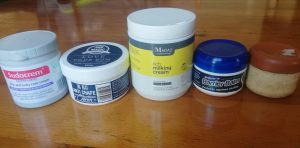
(Pic above) Sudocrem, Ass Magic, Madaji Milking cream, Squirt Barrier Balm, Dubbin
The testing ensures I don’t have any negative reaction to the cream, and I can evaluate how they hold up to the wetter conditions of kayaking and how easy they are to wash off.
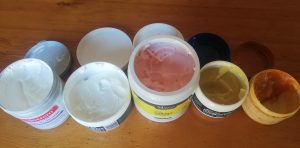
(Pic above) Sudocrem, Ass Magic, Madaji Milking cream, Squirt Barrier Balm, Dubbin
I have placed them in order of their viscosity. The thickest on the right being Dubbin, which will be only used on my hands.
A big “thank you” to the team from Squirt Cycling Products who arranged a bunch of goodies from their product range for me to test. It’s inspiring and really lekker to have support from local Proudly South African companies. Testing will continue over the next few months before I settle on my favourite.
My final skincare thought process goes to sun protection. The kayak stroke does not lend itself to an awning for sun protection. While paddling during the day I will be under the powerful rays of the sun. There is literally no place to hide from its relentless force, and not only from directly above but also from its harmful reflection off the water.
The first bit of the crossing, while it’s cooler, I will wear a long sleeve top – like a rash vest. But as I get more into the tropics, where the water is 28 degrees Celsius and the outside temperature – sitting in the sun – gets well into the 30s, a rash vest too will get unbearably hot.
Sunscreen will be my final defence. I favour a spray-on light cream with an SP factor 50 that is also waterproof. I will have to apply the sunscreen multiple times a day, as sweat and water eventually reduces its effectiveness.
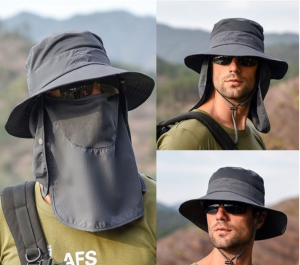
For face protection I always wear a wide-brimmed hat, and better yet, I hope to get something like this hat (see pic below) that will shield the relentless and uncompromising glare of the sun from the water off my face.
If you have had any similar experiences or ideas that you would like to share, please feel free to do exactly that.
Hit me up on Social Media Facebook and Instagram @RichardKohlerAdventures or email richkman@gmail.com
Keep paddling!
Navigating my way across the Atlantic Ocean from Cape Town to Salvador in Brazil is no mean feat, and in order to achieve my heady task I will need a few gadgets and safety essentials to ensure my Ocean X journey goes according to plan.
Here is some of the safety items I will need to paddle on this mammoth adventure:
First and foremost, this is a lifesaving essential that I hope to get my hands on soon. It’s a Switlik Inflatable Single Person Life Raft (ISPLR) and they are mostly used in the aviation industry. It’s compact and lightweight (2.8kg) – the only option for a craft as small as mine. But they come with a hefty price tag, so if anyone has one that they are not using for a few months I would be most appreciative.
There will be an EPIRB (emergency position-indicating radio beacon) and a 2 x PLB (personal locating beacon). Both work in similar ways but the EPIRB will transmit for a longer time (48hrs) due to its battery size.
An EPIRB is a safety device to alert search and rescue services, allowing them to quickly locate you in the event of an emergency. When activated it transmits a coded message (GPS position – Boats or Persons details etc) on the 406 MHz distress frequency, which is monitored by the COSPAS-SARSAT satellite system. The alert is then relayed via an earth station to the nearest Rescue Coordination Centre. The satellites are in a polar orbit, so they offer true global coverage.
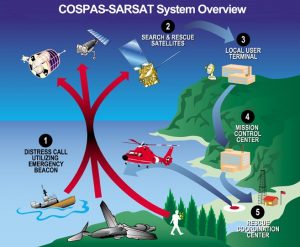
ABOVE: How an EPIRB works
A PLB is a specific type of EPIRB that is typically smaller, has a shorter battery life, and unlike a proper EPIRB is registered to a person rather than a vessel. With a PLB you can summon help wherever you are on the planet, no matter how remote.
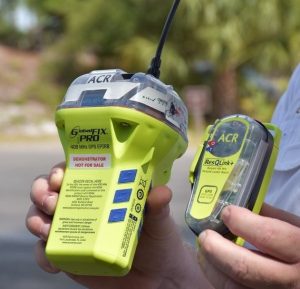
ABOVE: Example of an EPIRB & PLB
I will have an Inmarsat Satellite phone that will enable voice calls depending on the need like radio interviews, advice on repairing a piece of equipment or emergency services.
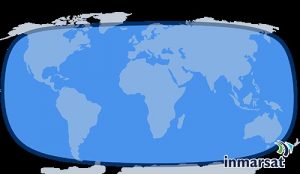
The Iridium Go allows me to make voice calls and text messaging via a smartphone. It also has other capabilities like a basic email service and will be used to receive my weather updates. It is one of the three tracking units on board.
There will be another two dedicated GPS trackers on board that will transmit my position, direction and speed to my shore team at defined intervals. These intervals are set depending on the likes of power consumption. My track will be automatically uploaded to my webpage for everyone to follow in real time.
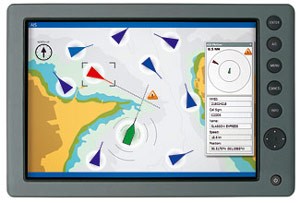
The Automatic Identification System (AIS) is a digital VHF radio-based transponder system that can prevent collisions, and more importantly, protect me from being run down by a huge, fast-moving ship!
Picture a radar-chart plotter display, with overlaid electronic chart data, that includes an icon for every significant ship within VHF radio range, each showing that vessel’s speed and heading. Each ship icon reflects the actual size of the ship, with positions accurate to GPS precision. By “clicking” on a ship mark, I can learn the ship’s name, course and speed, classification, call sign, MMSI, and other information.
The system’s range is like that of your VHF radio, essentially depending on the height of the antenna. AIS information is not degraded by rain-clutter like radar, so it works the same in all weather. AIS is extremely valuable, especially at night or at times when there is restricted visibility.
When outside I will always be attached to the kayak by a 10 ft body leash. I will use either a waist or leg leash depending on what I am doing.
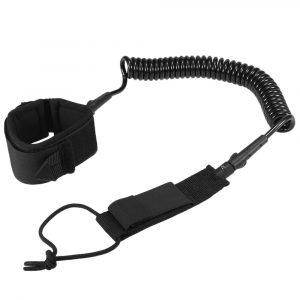
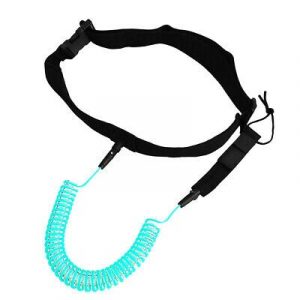
ABOVE: Leg Leash (left), Waist Leash (right)
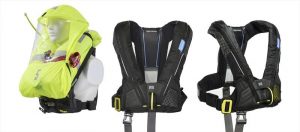
I will have an inflatable life jacket seen in the image below. My second PLB will be permanently attached to the jacket.
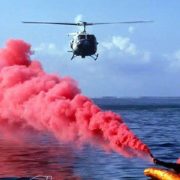
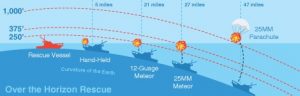
I will carry various signal flares in the form of a hand-held, rocket and smoke flare. Each type of flare is used for a specific purpose. Their purpose is to attract attention when immediate danger exists. They are only useful if someone is close enough to see them, so I need to use my good judgement when using as they are single use.
See the diagram below to understand each types range
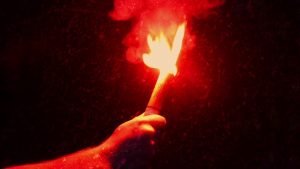
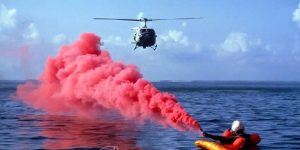
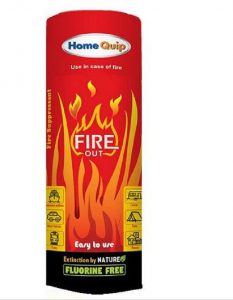
One small unit will be on board. Always a standard precaution!
A comprehensive medical kit will be put together to cover all possible scenarios, which I find are always needed at any time.
There will be two VHF radios on board, the main and most important one will be a fixed unit inside and the other a handheld unit. The fixed one has a greater transmitting power (25W) and thus a longer range than the handheld (5W).
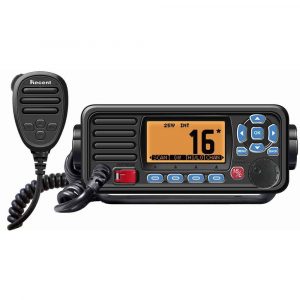
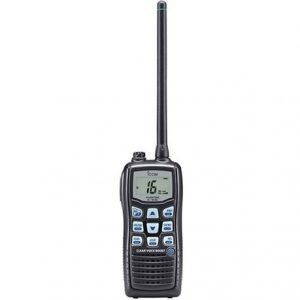
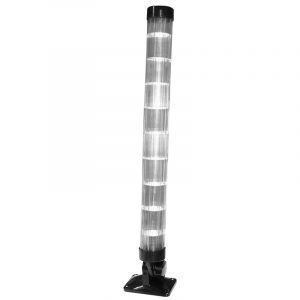
Radar Reflector
The kayak will give a very poor echo on a ship’s radar, especially in rough seas as it is so small and made of fibreglass. A tube radar reflector is simply an arrangement of metal elements crossed at several 90-degree angles in a plastic casing to reflect energy from the radars and thus enhancing the signal of the vessel.
I am being optimistic, I hopefully won’t need to use half of the above…but always be safe rather than sorry, the ocean can be a dangerous place.
Thank you to Graeme Taylor from Seaport Supply in Cape Town who will be assisting me with supplying all my safety equipment I will need for my journey. If you need any boating or marine equipment pop into their shop in Paarden Eiland and chat to a great bunch of guys.
Behind every great adventure is a team of people who help to bring the adventure alive. I am extremely lucky to have some great people and corporates supporting my dream.
Treble Group is a sports marketing and event management agency who are playing an enormous part in managing the project, from securing the much needed financial support and sponsorship to get the adventure off the ground, to managing the ongoing media and digital presence, helping me to build the brand.
The Treble Group is excited and privileged to have secured the premium publishing house, Highbury Media, as official media partner to Richard Kohler’s Ocean X adventure.

Highbury’s award-winning expertise in print and digital media communications will be integral in building the media presence for this incredible journey. Their team have already built and designed Richard’s website. The website allows fans and followers to stay up to date on Ocean X’s latest news. In addition, they will also assist with content generation. This will be leverage through their extensive digital and print magazine portfolio on the highly popular Cape Town Etc and Sports Club platforms.
Richard’s Ocean X adventure is a story about endurance, courage against the odds, and the indomitably of the human spirit. It’s a story that needs to be told. Which is why Treble is excited to partner with Highbury in documenting every stroke of Richard’s mammoth task.
If you would like to get involved with Richard’s Ocean X paddle from Cape Town to Brazil you can contact the Treble Group info@treblegroup.com or find the sponsorship opportunities here.
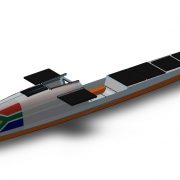
My unique ocean-crossing kayak needs an electrical source to power its numerous electronics required for me to achieve this heady task awaiting me. The biggest consumer of electricity, which is the most important aspect of my journey, is the water maker. Electricity can be generated using solar panels or wind generators.
In my case: Solar Power = Water = Life
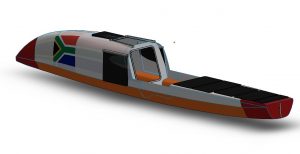
As there are so few kayak crossings, my research focused on ocean-rowing boats. I found that the majority of them experienced some sort of power problem during their crossings, so I need to ensure that I avoid similar issues.
The power generation and storage system for crossing has been designed by Tiaan Oosthuizen, a Tshwane University of Technology Solar Team Member & PhD student. Tiaan has studied the average sunshine for the past 22 years over the entire route I will be paddling. He has based the power generation requirements with this data against the power consumption expected by the electronics on board. Isn’t science and technology just great?
The daily average sun yield will decrease by almost half the closer I paddle to Brazil. When I leave Cape Town’s shores, there should be about 3kWh/day reducing to 1,8kWh/day near Salvador. The solar system I will be using is meticulously designed with a worst-case scenario in mind. Safety first!
Solar Panels are often used for electrical generation in rowing boats, and reliably produce energy for its systems. However, in foggy, overcast, or rainy conditions their output is significantly reduced. Considering the nature of this kayak and the limited space available, flexible solar panels are best suited for my daily requirements.
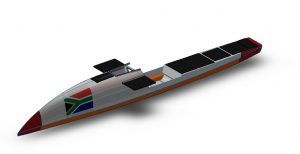
Performance is in direct ratio to cost, and unfortunately they are not cheap. A unique design departure that will dramatically increase solar power output are the two lifting and tilting side panels on the front compartment. Total solar array is 380watts.
Cost for cost they can produce more energy than solar panels. But of course they rely on steady winds and should be mounted as high as possible to get the least interrupted wind.
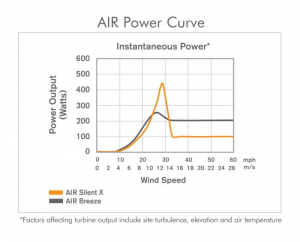
On a small kayak the main concerns are the weight and resistance of a wind generator and the negative effect this has on the stability of the boat. Considering that the average winds are expected to reach 12 to 15 knots, less my kayak speed, will give me an average of say 10 knots (5.2m/s) of wind. Looking at the graph below it is evident that there is not enough wind speed for efficient use of a wind generator.
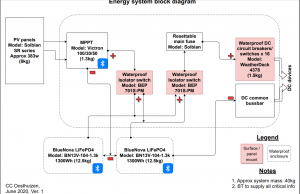
A maximum power point tracker (MMPT) is an electronic DC to DC converter that optimises the match between the solar array (PV panels) and the battery. To put it simply, they convert a higher voltage DC output from solar panels down to the lower voltage needed to charge batteries. MPPT controllers are 93-97% efficient. The charging information will be available to me via a Bluetooth app.
It is necessary to store the energy from the solar panels or wind generators and this will be done using two 12V 100ah LiFePO4 batteries. Traditionally marine deep cycle lead acid batteries have been used, but they only allow a maximum of 50% discharge and ideally as little as 20%. This would require at least twice the battery capacity compared to lithium-ion phosphate (LiFePO4). LiFePO4 batteries can be discharged to a much lower state of charge without damage. However they do come with a hefty cost penalty.
The two 12V 100ah LiFePO4 batteries come with a built-in BMS. It is the brains behind battery packs. They manage the output, charging and discharging, while also providing notifications on the status of the battery pack. They also provide critical safeguards to protect the batteries from damage.
Controlling the over and under voltage, overcurrent and short-circuit protection, over temperature and cell imbalance, the BMS monitors the battery to ensure safety and maximum lifetime over the full range of operating conditions. Most importantly, everything I need to ensure I remain hydrated! Water = Life.
Below is an overview of the power system
Keep paddling!
The mammoth challenge that awaits me as I mentally prepare for my Ocean X odyssey offers a rather simple, yet complex question: when is the best weather and correct time to kayak across the Southern Atlantic?
It would be virtually impossible to kayak across an ocean if the elements are not in your favour and the most important weather elements to consider are the winds and currents. Failing to prepare leaves me with no option but to prepare to fail and even that theory can be quashed by the sudden change in the elements of Mother Nature.
The Southern Atlantic Ocean is dominated by the South Atlantic subtropical high pressure, which basically sits over the middle of the ocean. In the centre of the high pressure there are generally calm winds and variable winds. Moving outwards the wind speed and direction become greater and from a more constant direction
I’ll be departing from Cape Town and those who live and grew up in the fairest Cape know that during the winter months the cold fronts (low pressure systems) bring the north-westerly winds that create big sea swells and lots of rain.
The direction that I will be heading on my journey from Cape Town to Brazil is in a North-Westerly direction so trying to paddle into a headwind during the winter months would be futile. I’d be wasting a lot of time and energy for hardly any gain.
During the summer months though, the opposite happens as the South Atlantic high moves South and pushes the cold fronts downwards and away from Cape Town. Summers here in the Cape are normally dominated by the South Easterly winds that blow in the direction that I want to pursue in achieving my Ocean X dream.
A week after leaving Cape Town it is highly likely that I will move into an area of consistent South Easterly winds known as the Trade Winds. These winds blow in an arc around the high-pressure system, thus helping me towards Brazil.
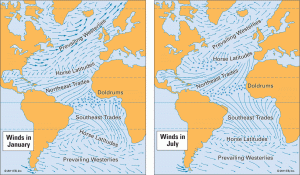
The ocean winds are also the main driving force of the ocean currents and they generally follow the direction of the winds, so waiting for the summer months will again work in my favour. ‘Timing is everything’ as they say in life.
One thing about ocean currents is that they do not move in a perfectly straight line. There are lots of what is termed as ‘eddies’, which is a circular current of water. It will be very important for me to not get stuck in the bogey counter-currents known as ‘eddies’.
When sailors – and now kayakers – plan for an ocean crossing, they use what is known as routing charts. There are routing charts for every month of the year, which indicates the average conditions that could be expected for a given month using empirical recorded data over the past 20 years.
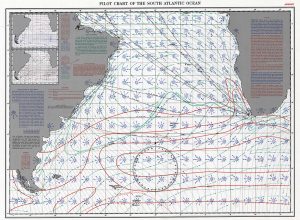
On the right-hand side of this chart there are detailed overviews of the temperature, wind, visibility and the wave heights.
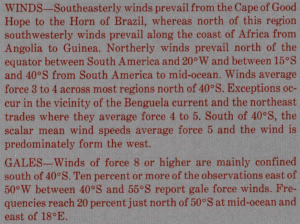
As you can read from the image above of the wind description, the South East wind is the most dominant between the Cape of Good Hope and the Horn of Brazil – a good time to be kayaking over 6000kms across the ocean!
A routing chart also includes several smaller inserted charts as seen in the image below.
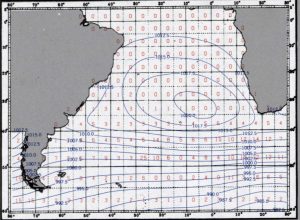
As you can deduct from the gales and pressure the red numbers in the centre of each square show the average percentage of ship reports in which winds of at least Force 8 have been recorded. The blue lines show the average barometric pressure at sea level.
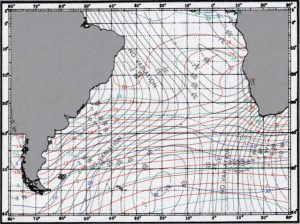
This chart shows the mean air temperature in Celsius in the red line showing every 2 degrees. The blue lines show the percentage of observations reporting visibility of less than 2 miles and the green lines are the average sea surface temperature in Celsius and show for every 4 degrees.
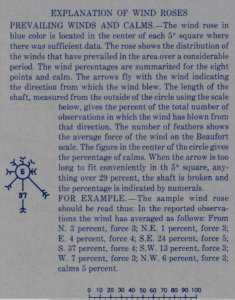
Every 5 degree square on the routing chart includes a Wind Rose. Above is the explanation of the Wind Rose. A cursory glance of the Wind Roses between Cape Town and Brazil show the South East arrow is the most dominant, which compares with the general wind description as indicated earlier.
But if you take a closer look at the Wind Roses around Cape Town you will notice there is a fair amount of wind blowing from other directions.
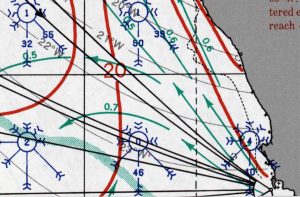
The most problematic wind for my departure would be the South West and Westerly winds, which could potentially blow me on to the shore wreaking havoc before I have even left the fairest Cape!
I will have to wait for a weather window that has about five or six days of Southerly and South East winds that will enable me to get North / a little bit West, so if I do encounter any winds from the West I would have made enough sea room to keep me from being blown on to the shore.
The other thing to note are the thick red lines that indicate the percentage frequency of having wave heights greater than 12 foot.
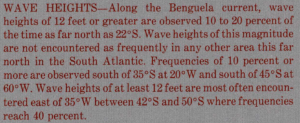
This brings me back to the beginning where I posed question: when is the correct time to kayak across the Southern Atlantic?
It would be virtually impossible if the elements are not in your favour and the window period for me to achieve my ultimate goal is December to the end of February when I can look forward to catching that treasured glimpse of South American land.
Keep paddling!
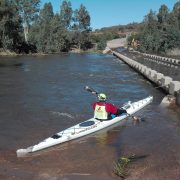
When I finally had the time to take it all in and reflect, I had paddled 310km in 38hrs and had not slept for 47hrs. I was knackered but still brimming with pride as the last remnants of adrenalin had subsided and the warmth of it all had set in.
As part of my preparations for my solo Ocean X mission, it was a no-brainer when I decided to undertake my own virtual version of the Ultra Paddle. Cold doesn’t begin to describe how I felt during this paddle and the lack of sleep induced some vivid hallucinations during the final seven hours of this challenging adventure. All I can say is thank heavens for coffee and hot soup!
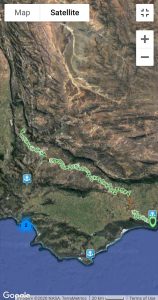
Experimenting with different concepts is vital for success when planning an adventure. Often the simplest idea is the best. I started at 2pm on Friday at the confluence of the Dwas and Whittle rivers. It had been 11 long months since I had been here last, which was also a source to sea trip but on a stand-up paddle board.
The first section to the White Bridge is narrow and fast flowing with a number of short rapids guaranteed and tree blocks to get the adrenaline flowing. The water level was manageable but still low enough to run aground if you took the wrong line through the shallows.
I had brought along an extra mobile phone to use for social media updates but there was no cellular signal and I only once managed to get a Vodacom signal around Robertson. The other mobile phone was to run the SafeTrx app, which enabled friends and family to track my movements.
The navigation app was meant to assist in choosing the correct route during the night, but with different options being only a few meters apart, the weakness of my cunning plan quickly became apparent and I was often fighting my way through the trees in unknown channels. Once in the Bontebok section the app was mostly useless, which I think was due to poor GPS signal of the phone.
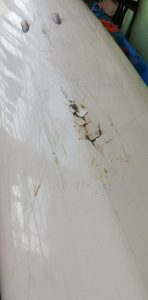
On the Wyzersdrift section I had hit a bollard on a low-level bridge and gashed a 15cm hole in the hull below my feet. I was frustrated with myself for taking the wrong line and while mentally giving myself a telling off, I took another wrong turn and ended up in some random flooded channel blocked by more trees. No time to dwell on mistakes. Just dust yourself off and paddle forward!
At Slanghoek low-level Bridge I examined the damage and used duct tape to make some repairs. In my early days of paddling I would tear off a single strip of tape to cover the hole. The first scrape over any object would peel the tape off and I would have to repeat this multiple times to get to the end.
A few years ago, while doing a previous source to sea mission, my good friend Ralph showed me the fish scale technique. Starting from the tail side, you place little square pieces of tape. Each one overlapping the previous one as you work your way forward. Any scrapes thereafter may cause the first square or so to dislodge but not the whole lot, which eliminates multiple stops for repairs.
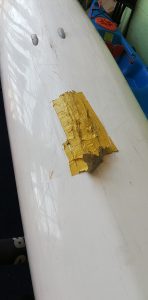
It started to get dark as we approached the finish bridge of the Wyzersdrift race. From there to the N1 bridge is a short 4km section but is completely blocked with trees. It took ages to wade through in the dark and visibility was a challenge – even with a torch the steam rising from the water into the cold air made for tough navigation.
The flat land above Nekkies resort was straight forward as the flooding waters had receded back into the main channel. I chose to shoot weir and it was just a nice big wave train but I did get a good soaking. Alvies Bridge was going to be the next stop to have a much-needed hot cup of soup to restore morale as the temperature had already dropped to almost zero.
About 19 km later at La Chassseur Weir I stopped for another cup of soup, because it was getting unbearably cold. My fingers were numb and I could not even tear open the packet, resorting to my teeth to open it in nervous anticipation of warm nourishment of the welcome soup.
At Goree Weir, the channels were relatively easy and the big wave trains on the way down to the pool certainly got me joyfully bouncing in the dark. Unsure of the water level in the Silverstream sneak channel I decided to portage the low-level Bridge.
This was a very good decision as the water was just over the bridge but the Blue Bollards were still sticking out and a simple slip-up would have been the end of the kayak. The S-bend at the bottom of the channel into the Silverstream pool was over so quickly and without any drama. At the Weir below Silverstream I managed to sneak over the far right-hand side without portaging.
By the time I approached McGregor bridge, which is the start of the Breede River Marathon, It was just after 4am in the morning. An egg, cup of coffee and a freeze-dried meal was welcomed with glee and I was set for the rest of the day.
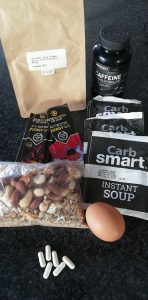
After more than 24 hours of no sleep I was pleased to find that I was still mentally lucid. During the cold and dark times of the night I was struggling with simple mental tasks like trying to figure out what the distance to the next point would be and even basic maths. As soon as the darkness faded into light my brain seemed to wake up again and function normally.
The next stop was Bonnievale Causeway. I had had company in the form of Peter, who decided that after 146km and one night of paddling, it was time for him to say his goodbyes. It was wonderful to have some company for the first section of the river, but now I was on my own and paddling the second half of the Breede River Marathon race and the first of many big long flat sections.
It was all plain sailing for a while. Waterfall rapid was just a small wave train offering no real challenge and then the many long flat pools had to be crossed. Surprisingly, it went relatively quickly but I guess I was running on autopilot.
Popping over Swellendam weir and going under the N1 bridge was a good moment knowing that I just managed to claim 200 km. I had a short stop at the Bontebok National Park to redo some duct tape repairs. Getting out and standing up was now becoming quite a struggle.
I was now chasing the setting sun. One of the sections I did not want to do in the dark was the channel after Hole-in-the-Wall rapid. At Hole in the Wall I managed to navigate my way down the far left-hand side without too much drama and very shortly after that was up my dreaded channel.
As I made my approach, I decided that the water level was high enough to try to sneak to down the far left-hand side to avoid the channel completely. Good choice. No drama. It was now pretty much pitch black. There was also no signal in this part of the valley, so if anything went wrong I was on my own until I climbed out and found cell phone signal.
Sometime during the night, I realised I had completed the first goal of the expedition, the Ultra Paddle, a 240km virtual Berg River Marathon in aid of Canoeing SA and the #canoeing4covid food relief fund.
The next three hours of paddling was some of the most intense and terrifying moments I have ever experienced. By now I had learned the difference between the sound of water rushing through trees and the sound of water rushing over and around rocks. The water rushing around the rocks is a deeper growling sound than that of trees.
The flashlight’s maximum range was about 2m and the headlight was even less as the fog began to thicken. I was now mostly navigating by sound making sure that the boat was following the flow of the water and not to get caught perpendicular to the stream, risking being washed upside on to a rock.
This would have ended in disaster as the boat could wrap around the rock and be destroyed or worse, leaving me pinned against the rock. I knew once I got to the end of this section, I would be in the clear with no more rapids left to contend with. It was with less than 1km to go to this safe point when disaster almost struck.
Suddenly a massive whirlpool appeared beneath me, instantly spinning the boat 180 degrees and as quickly as it appeared it vanished but was replaced with a huge surge of water that pushed the kayak sideways into a tree stump sticking out of the river. The kayak wedged hard up against the log.
Instinctively I leaned the kayak towards the log stopping it from flipping upstream. I managed to get one good push with my foot against the log just as the kayak was starting to crack and fold. As the kayak moved backwards, the upstream rail dipped in the water, flipping it, but also same time dislodging it from the log.
I was now floating downstream next to my kayak, soaked to the bone and rattled mentally. Happily, I paddled into the flat pool a minute later and I realised that I had past the worst of it and now only had 65km of flat water remaining.
The following stretch of river to Malgas was uneventful besides the tall trees along the bank started to look like cartoon characters in the contrasting light of the stars. At Malgas I managed to get a cup of soup into my stomach. I did not stay long as I wanted to keep moving before my body shut down completely. By this time, I was not able to stand without assistance and walking was not a very pretty sight!
The final 35km to the sea was purely a mental battle. The hallucinations from lack of sleep were coming to the fore. At some stage I realised that I was paddling into the incoming tide and decided to stay close to the left-hand bank to stay out of the fastest flow. Being so close to the bank my head torch could light up the rocks and trees and all these turned into fantastic creatures.
I spent many hours muttering to them and asking them things like “how far to go” and “am I going in the right direction”. They never did answer but quietly cheered me on. At one stage I ran aground on a rock from which I could not push myself off, so I tried to stand.
I ended up falling into the river and thinking that if I don’t get back on to this kayak right away, I will end up floating in the river forever. Not one of my new animal friends bothered to help me. I stopped talking to them after that!
After many attempts I got myself back into the kayak and realised that the grounding had dislodged the duct tape repair and quite possibly a kayak was now going to take in a lot of water but I was in no physical or mental state to do anything about it.
When I eventually made it to the finish line I could no longer manage to stand. Paul had to manhandle me out of the kayak and literally carry me to the vehicle. The kayak had filled with so much water that they could not get it up the slipway. After 38hrs of paddling 310km and 47 hours of no sleep, I had successfully completed my goal.